If you would prefer a visual / narrated version of this blog post, feel free to watch my talk at WWDC25
APIs are the digital backbone of modern software, powering everything from online banking and retail to AI-powered automation and connected vehicles. They form the foundation of digital transformation strategies, but as their ubiquity grows, so does the impact of their failure. In this post, we’ll explore the historical pitfalls of API design, the challenges posed by modern microservice architectures, and how contract testing offers a path toward resilient, scalable, and future-ready APIs.
APIs: The critical infrastructure of the digital age
APIs aren’t just developer tools anymore – they’re mission-critical infrastructure. Whether it’s unlocking a car via a mobile app or facilitating multi-billion dollar e-commerce transactions, APIs enable seamless digital interactions. But as reliance on APIs deepens, so do the consequences of poorly designed, insecure, or untested endpoints.
What we’ve learned from 20+ years of API failures
Let’s explore a few high-profile examples of API-related failures:
1. Zombie APIs and legacy debt
APIs are only secure and manageable when they’re visible. A legacy app at T-Mobile, using outdated encryption, was exploited – highlighting the dangers of forgotten endpoints.
2. Insecure design
Kia discovered the hard way that unsecured API endpoints could allow unauthorized remote access to vehicles. Poor upfront security design led to APIs being misused with minimal information.

3. Knowledge loss and poor documentation
Twitter (now X) faced major internal disruptions when technical staff were let go without preserving essential knowledge. One internal change took down parts of the platform – proof that tribal knowledge is not a scalable strategy.
https://www.theverge.com/2023/3/6/23627875/twitter-outage-how-it-happened-engineer-api-shut-down
The growing complexity of API landscapes
Modern software development has evolved dramatically:
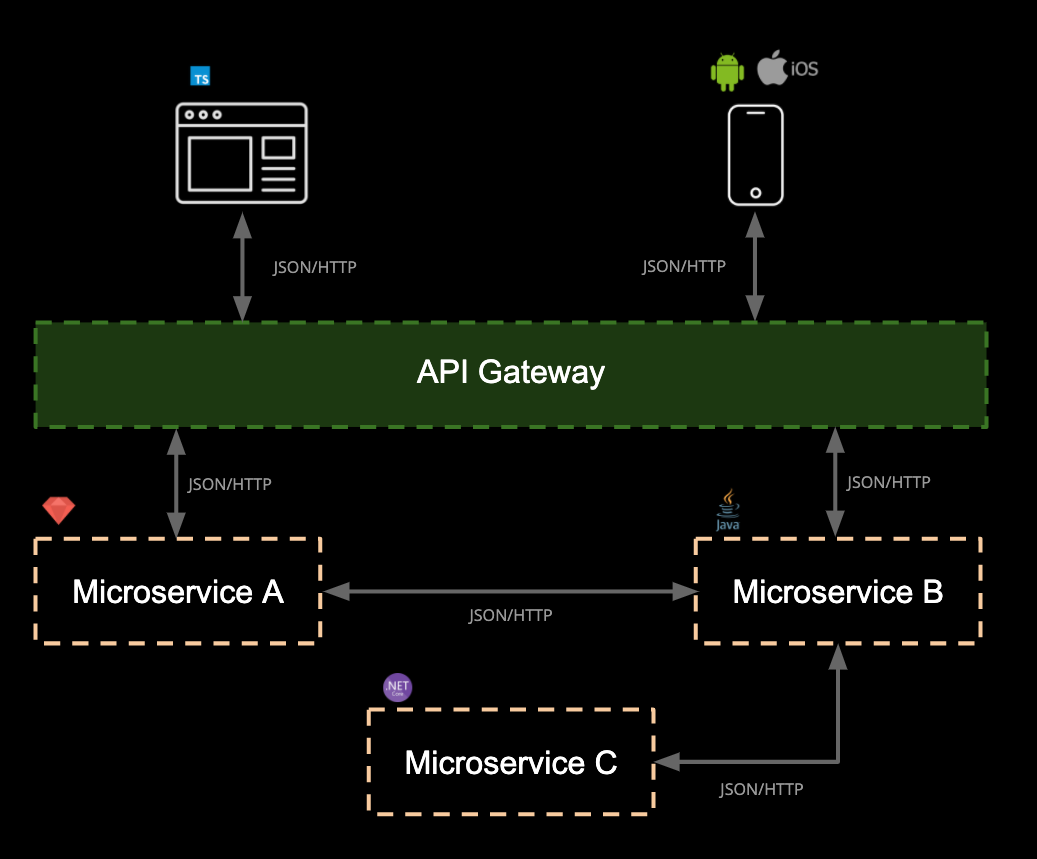
- From monoliths to microservices
- From waterfall to agile/DevOps
- From on-prem to cloud-native, distributed systems

Each of these transitions introduces new failure points. With microservices, for example, a single application may be split across hundreds of services. This leads to “microservice sprawl,” where system complexity becomes unmanageable.

A visual metaphor often used is the “microservices death star”—an explosion of interdependent services, each introducing potential failure and maintenance overhead. The following image shows popular services, in their infancy, as the images are around 10 years old. Despite the young age of these services, they were incredibly complex systems, which will have only grown over time.

Key stats (State of Software Quality – API 2023):
https://smartbear.com/state-of-software-quality/api
- 61% of API growth stems from microservices
- 81% of companies operate in multi-protocol environments
- 57% use three or more protocols (REST, GraphQL, Kafka, etc.)


According to State of API in 2023, there are a number of obstacles to producing APIs, the most common of which is a lack of time. The second largest contributor is a lack of people, followed by a lack of API design skills.

Design skill gaps may contribute to an over proliferation of microservices. This is problematic as too many APIs or microservices is noted by State of API as the sixth biggest obstacle to producing APIs, leading to “microservice sprawl”
https://smartbear.com/state-of-software-quality/api/challenges/#
The testing dilemma in a microservice world
Testing in modern systems is harder than ever. A quote from a real-world API team illustrates this:
“We’ve got GraphQL, REST, Kafka, EventBridge… Testing inside a highly volatile set of integrated environments is extremely challenging. We need faster feedback and more reliability.”
So, why does traditional testing fall short?
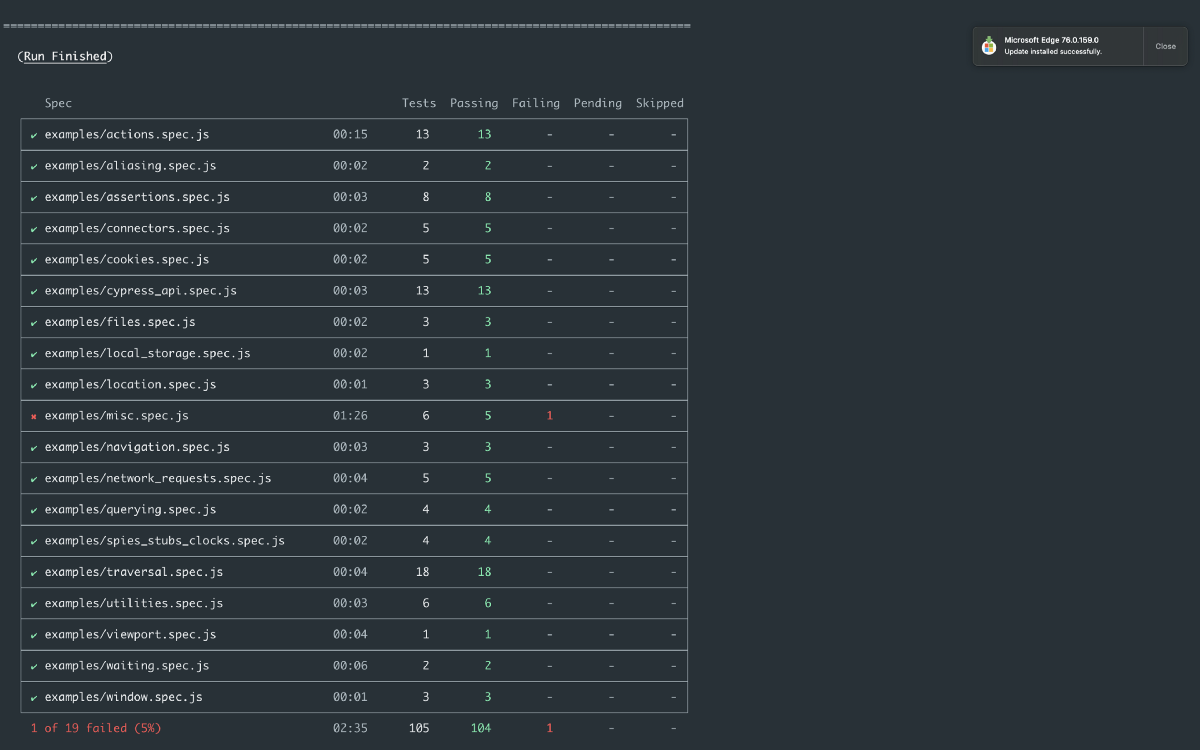
- End-to-end testing is flaky, slow, and brittle
- Integration environments are expensive and complex to maintain
- Unit tests are fast but lack confidence in integration behavior


The testing pyramid: Balancing speed and confidence
To balance cost, confidence, and coverage, the testing pyramid offers guidance:
- Base: Unit tests – fast, low cost, low coverage
- Middle: Integration tests – fast, high confidence in integrations
- Top: End-to-end tests – highest confidence, but fragile and slow

We might choose to shift our integration testing concerns into unit testing, but it brings along a false sense of confidence for developers.

The role of API specifications
API specifications like OpenAPI and AsyncAPI have become the standard for documenting APIs:
- OpenAPI for RESTful services
- AsyncAPI for event-driven architectures
These specifications serve as machine- and human-readable contracts. They enable automation in SDK generation, testing, governance and many other aspects of the software developer lifecycle.

But they come with pitfalls:
Challenges:
- Provider drift: When the implementation diverges from the spec.
- Consumer drift: When changes to the spec break real-world consumers.
- Versioning chaos: Without insight into actual usage, it’s hard to manage versions effectively.
- Lack of governance: Teams building APIs independently without central standards lead to inconsistency.
Tools like SmartBear Spectral (by Stoplight) and Vacuum help enforce governance rules using custom linters for OpenAPI/AsyncAPI specifications.

Enter contract testing: Verifying real integration needs
Contract testing solves a central problem in API development: verifying that consumers and providers agree on how to interact – without needing to spin up full integration environments.
What is contract testing?
Contract testing validates:
- The consumer’s expectations of the API
- The provider’s ability to meet those expectations
Rather than mocking with guesses, contract tests are based on real interaction contracts.


The Pact workflow:
- Consumers write tests → Pact generates contracts (as JSON)
- Contracts are published to a broker (e.g., PactFlow)
- Providers verify these contracts against real code
- Safe deployments are validated via can-i-deploy tooling


Contract testing helps shift validation left in the development lifecycle, enabling:
- Safer refactoring
- Independent deployments
- Fewer integration surprises

From code to design-first: Bidirectional contract testing
If your team uses OpenAPI or AsyncAPI specs, Pact now supports bidirectional contract testing. This means:
- You can verify the API spec against real-world usage
- You reduce onboarding time for teams using design-first approaches
Pact contracts must be both concrete (behavioral) and valid subsets of your spec. This helps eliminate provider drift while maintaining human-readable documentation.

This now extends in SmartBear API Hub, to provide API Architects and consumers the ability to edit API specifications and determine impacted consumers, directly in their editor.

What’s next? AI, agentic consumers, and Arazzo
AI-generated contract tests
To lower the barrier of entry, AI-generated contract testing can scaffold tests based on:
- OpenAPI specs
- Code annotations
- Patterns learned from 10+ years of contract testing best practices


Maximising the value of end-to-end testing, whilst addressing pitfalls
When we consider our test pyramid, we get the most confidence from activities performed higher up the stack. End to end tests ensure we are satisfied that the core journeys in our system work as expected, but have a large co-ordination effort to setup.
These activities are normally driven by a browser, this is very costly in terms of time/flakiness due to the remote nature of a browser interaction.
Subcutaneous (under the skin) testing allows us to drive user facing journeys, traditionally performed by the browser, by instead using the API calls that bind them.

•✅ More reliable tests
•✅ High-confidence levels
•❌ No leading specification to document these API focused workflows
Agentic workflows & Arazzo

With AI agents poised to become major API consumers, workflow-level testing will be essential. The new Arazzo specification (by the OpenAPI Initiative) defines workflows and user journeys in deterministic, testable ways.
Example use case:
- An agent books travel by composing multiple APIs (search, booking, payment)
- Arazzo describes this as a sequence of API calls with clear data flow
This future-focused tooling enables:
- Visual flow documentation
- Testable orchestrations across APIs
- Safe automation in AI-driven environments


Final thoughts: Resilient APIs require intentional design and testing
To evolve your APIs for the future, consider this roadmap:
✅ Use OpenAPI/AsyncAPI to standardize and document
✅ Enforce rules with tools like Spectral
✅ Apply contract testing to decouple integration testing
✅ Use Pact (or equivalent) to enable safe deployments
✅ Prepare for AI consumers and document your E2E journeys with Arazzo workflows
With thoughtful governance, scalable testing, and a commitment to consumer visibility, your APIs can evolve gracefully over time, allowing your organisation the freedom to adapt to ever-changing markets and demands.